Chapter 1
- Introduction
ബ്ലെന്ഡര്
സ്വതന്ത്ര
സോഫ്റ്റ്വെയറില് ലഭ്യമായ
മികച്ച ത്രിമാന കംപ്യൂട്ടര്
ഗ്രാഫിക് അനിമേഷന്
സോഫ്റ്റ്വെയറാണ് ബ്ലെന്ഡര്.
ഇതുപയോഗിച്ച്
നിര്മ്മിച്ച പ്രധാന അനിമേഷന്
സിനിമകളാണ് "ബിഗ്ബക്ക്
ബണ്ണി" ("പീച്ച്"
എന്നു
വിളിപ്പേരുള്ള ഒരു തടിയന്
മുയലിന്റേയും പെരുച്ചാഴിക്കൂട്ടത്തിന്റെയും
കഥ),
"എലിഫന്റ്സ്
ഡ്രീം", “സിന്റല്"
മുതലായവ.
"യോഫ്രാങ്കി"
എന്ന സ്വതന്ത്ര
കംപ്യൂട്ടര് ഗെയിമും
ബ്ലെന്ഡര് സോഫ്റ്റ്വെയറില്
തയ്യാറാക്കിയതാണ്.
IT@School
കസ്റ്റമൈസ്
ചെയ്ത OS ( Ubuntu 10.04 or 11.04
or 12.04) ആണ്
ഉപയോഗിക്കുന്നതെങ്കില്
Blender സോഫ്റ്റ്
വെയര് അതില് ലഭ്യമാണ്.
മൗസ്
(Three-button mouse with a wheel),
കീബോര്ഡ്
(Keyboard with a numeric keypad )ഇവ
പൂര്ണ്ണമായും ഉപയോഗപ്പെടുത്തേണ്ടുന്ന
രീതിയിലാണ് ഈ സോഫ്റ്റ്വെയറിന്റെ
ഇന്റര്ഫേസ് ഡിസൈന്
ചെയ്തിരിക്കുന്നത്.
The
mouse buttons :
- LMB - left mouse button
- MMB - middle mouse button
- RMB - right mouse button.
If our mouse has a wheel :
- MMB - refers to clicking the wheel as if it were a button, while
- Wheel - means rolling the wheel.
ഇന്സ്റ്റാള്
ചെയ്തു കഴിഞ്ഞാല് Applications
--> Graphics --> Blender എന്ന
രീതിയില് നമുക്ക് ഇത് തുറക്കാം.
തുറന്നുവരുന്ന
ജാലകം ശ്രദ്ധിക്കൂ.

തുറന്നുവരുന്ന
ജാലകത്തിലെ സ്പ്ലാഷ്
സ്ക്രീനില്(Splash
Screen) ബ്ലന്ഡര്
സോഫ്റ്റ്വെയറിന്റെ ഏതു
വേര്ഷനാണ് നാം ഉപയോഗിക്കുന്നതെന്ന്
മനസ്സിലാകും.
സ്പ്ലാഷ്
സ്ക്രീനിലോ ജാലകത്തിലെവിടെയെങ്കിലോ
ക്ലിക്ക് ചെയ്യുന്നതോടെ
സ്പ്ലാഷ് സ്ക്രീന്
അപ്രത്യക്ഷമാകും.

5
വിന്ഡോകളും
( Info
window, 3D window, Timeline window, Outliner window,
Properties window) , Tool Shelf, Cube , 3D
Cursor, Camera, Lamp തുടങ്ങിയവയും
തുറന്നുവന്നിരിക്കുന്ന
ജാലകത്തില് കാണാം.

നമ്മള്
ഇപ്പോള് കാണുന്ന സീനില്
(3D വിന്ഡോയില്)
ത്രിമാന
രൂപങ്ങള് തയ്യാറാക്കുന്നതിനുള്ള
ഒരു അടിസ്ഥാന വസ്തുമാണ്
(basic mesh object ) ക്യൂബ്
(Cube). സീനിനെ
പ്രകാശിപ്പിക്കുന്നതിന്
Lamp ഉം
സീനിനെ കാണിക്കുന്നതിന്
Camera യും
ഉപയോഗിക്കുന്നു.
3D വിന്ഡോയില്
ഒബ്ജക്ടുകളെ എവിടെ
നിര്ത്തണമെന്ന് തീരുമാനിക്കുന്നതിന്
3D cursor ഉപയോഗിക്കുന്നു.
3D cursor ന്റെ
സ്ഥാനം മാറ്റുന്നതിന് LMB
ഉപയോഗിക്കുന്നു
(clicking the Left Mouse Button). കൂടാതെ
ഒബ്ജക്ടിന്റെ മധ്യബിന്ദുവിലൂടെ
X, Y, Z എന്നീ
അക്ഷങ്ങളെ സൂചിപ്പിക്കുന്
ആരോ മാര്ക്കുക്കളും കാണാം.

ഈ
അക്ഷങ്ങളിലൂടെ ക്യൂബിനെ
നീക്കി നോക്കൂ (using
LMB – Click and Drag).
3D
പ്രോഗ്രാമുകളില്
നീളം, വീതി,
ഉയരം (Length,
Breadth, Height ) തുടങ്ങിയവ
പരിഗണിക്കേണ്ടതുണ്ട്.
ഇന്പുട്ട്
ഉപകരണമായ മൗസ് ത്രിമാന
ചിത്രങ്ങള് തയ്യാറാക്കുന്നതില്
പ്രധാന പങ്കു വഹിക്കുന്നുണ്ട്.
Left
Mouse Button (LMB) - 1. To move the 3D cursor around on the
screen.
2. For dragging windows for
selecting objects.
3. For moving objects along
the axes.
4. Shift LMB : For moving
objects anywhere in 3D Window
Right
Mouse Button (RMB) - 1. To select object (in object mode)
2. To select the vertices
or edges or faces of the object in edit mode
3. Shift RMB : Add to
existing selection.
Mouse
wheel (MMB) - 1. Scrolling the wheel zooms in and out
2. Holding
down the mouse wheel will rotate the view
3. Holding
down Shift and Mouse Wheel will pan around on the screen.
അതുപോലെ
കീ ബോര്ഡും ( Keyboard
with a numeric keypad ) ത്രിമാന
ചിത്രങ്ങള് തയ്യാറാക്കുന്നതില്
പ്രധാന പങ്കു വഹിക്കുന്നു.
ഏതാനും കീ
കളുടെ ഉപയോഗങ്ങള് താഴെ
കൊടുക്കുന്നു.
G
- Move R - Rotate
S
- Scale Shift A - Add Object
X
- Delete T - Tool Shelf ( show / hide)
N
- Transform Panel ( show / hide) Ctrl Z - Undo
Shift
Ctrl Z – Redo Shift D - Dupicate
H
- Hide Alt H - Unhide
A
- Select All / Deselect All B - Box Select
C
- Circle Select
ബ്ലന്ഡര്
സോഫ്റ്റ്വെയറിനെക്കുറിച്ചുള്ള
വളരെക്കുറച്ച് വിവരങ്ങള്
മാത്രമാണ് ഇവിടെ സൂചിപ്പിച്ചത്.
Lesson
2 - Modelling
ദ്വിമാന
അനിമേഷന് നിര്മ്മാണത്തിന്റെ
വളരെ പ്രധാനപ്പെട്ട ജോലിയായിരുന്നു
ചിത്രരചന.
അതുപോലെ
ത്രിമാന അനിമേഷന് നിര്മ്മാണത്തിന്റെ
വളരെ പ്രധാനപ്പെട്ട ജോലിയാണ്
Modelling.
വളരെയേറെ
സമയമെടുത്ത് ചെയ്യേണ്ട ഒരു
പ്രവര്ത്തനമാണിത്.
താഴെ
കാണുന്ന രീതിയിലുള്ള ഏറ്റവും
ലളിതമായ ഒരു ത്രിമാന ചിത്രം
(Missile or
Rocket....) തയ്യാറാക്കി,
അതിന്
ചലനം (Animation)
നല്കാനുള്ള
പ്രവര്ത്തനം നമുക്ക് ചെയ്ത്
നോക്കാം.

Step
1. ബ്ലന്ഡര്
സോഫ്റ്റ്വെയര്
തുറക്കുക(Applications
→ Graphics → Blender)
Step
2. സ്പ്ലാഷ്
സ്ക്രീനിലോ ജാലകത്തിലെവിടെയെങ്കിലോ
ക്ലിക്ക് ചെയ്ത് സ്പ്ലാഷ്
സ്ക്രീന് അപ്രത്യക്ഷമാക്കുക.
Step
3. 3D വിന്ഡോ
വലുതാക്കാന് വേണ്ടി Tool
Shelf നെ
താത്ക്കാലികമായി hide
ചെയ്യാം.
Press T (or View → Tool Shelf )
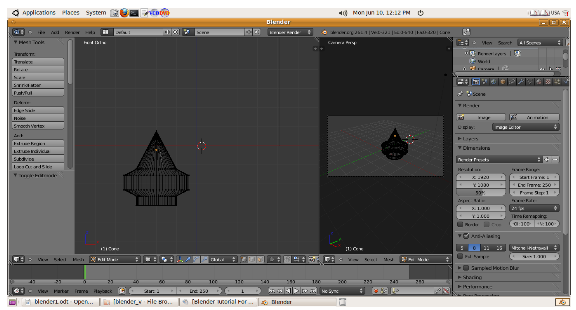
Step
4. താഴെ
കാണുന്ന രീതിയില് 3D
വിന്ഡോയുടെ
രണ്ട് View
കള്
ലഭിക്കാന് വേണ്ടി 3D
വിന്ഡോയുടെ
വലതു മുകള്ഭാഗത്തെ മൂലയിലേക്ക്
മൗസ് പോയിന്റര് കൊണ്ടുവരുമ്പോള്
കഴ്സര് +
ചിഹ്നമാകുമ്പോള്
LMB ഇടതു
വശത്തേക്ക് ഡ്രാഗ്ഗ് ചെയ്യുക.
അതിനുശേഷം
രണ്ടാമത്തെ 3D
വിന്ഡോയിലെ
Window
Header ലെ
View
മെനുവില്
നിന്നും Camera
സെലക്ട്
ചെയ്യുക.

Step
5. ഒന്നാമത്തെ
3D വിന്ഡോയില്
Tool shelf നെ
വീണ്ടും ഉള്പ്രെടുത്തുക.
Press T or View → Tool Shelf
Step
6. 3D വിന്ഡോയില്
(default scene) കാണുന്ന
Cube, Camera, Lamp തുടങ്ങിയവയില്
നിന്നും Cube നെ
delete ചെയ്യാം.
Select
the Cube ( Right click on the Cube) → Press X → Click on
Delete.
Step
7. 3D cursor നെ
കേന്ദ്ര (0,0,0) ത്തിലേക്ക്
കൊണ്ടുവരാം .
Object
→ Snap → Cursor to Center എന്ന
ക്രമത്തില് ചെയ്യുക.
Step
8. 3D വിന്ഡോയില്
വൃത്തസ്തൂപിക (Cone)
യെ
ഉള്പ്പെടുത്താം.
Add → Mesh → Cone എന്ന
ക്രമത്തില് ക്ലിക്ക്
ചെയ്യുന്നതോടെ ഒരു Cone
പ്രത്യക്ഷപ്പെട്ടിരിക്കും.
ബ്ലന്ഡര്
സോഫ്റ്റ്വെയറില് ത്രിമാന
ചിത്രങ്ങള് വരയ്ക്കുന്നതിനുള്ള
ധാരാളം വസ്തുക്കള് (
Plane, Cube, Circle, UV Sphere, Icosphere, Cylinder, Cone, Grid,
….)ലഭ്യമാണ്.
ഇപ്പോള്
പ്രത്യക്ഷമായിരിക്കുന്ന
Cone (Object)
സെലക്ട്
ആയിരിക്കും.
ഒബ്ജക്ടിന്റെ
ബാഹ്യഅരികിലൂടെ കാണുന്ന
ഓറഞ്ച് കളറില് നിന്നും ഇത്
മനസ്സിലാക്കാം.
കീബോര്ഡിലെ
A യില്
ക്ലിക്ക് ചെയ്താല്
ഒബ്ജക്ടുകള്(
Cone, Camera, Lamp ) Deselect ആകും.
വീണ്ടും
A യില്
ക്ലിക്ക് ചെയ്താല്
ഒബ്ജക്ടുകള്Select
ആകും.
Cone മാത്രം
സെലക്ട് ചെയ്യാന് RMB
ഉപയോഗിച്ചാല്
മതി (Click
Right Mouse Button on the Object). സെലക്ടായിരിക്കുന്ന
ഒബ്ജക്ടിന്റെ സ്ഥാനം
മാറ്റണമെങ്കില് കീബോര്ഡിലെ
G യില്
ക്ലിക്ക് ചെയ്തതിനുശേഷം
മൗസ് ഉപയോഗിച്ച് ആവശ്യമായ
സ്ഥാനത്തെത്തിയശേഷം LMB
ക്ലിക്ക്
ചെയ്താല് മതി.
Mouse
Wheel സ്ക്രോള്
ചെയ്താല് Zoom
in / Zoom out സാധ്യമാകും.
Mouse
Wheel അമര്ത്തിപ്പിടിച്ചുകൊണ്ട്
മൗസ് ചലിപ്പിച്ചാല്
ഒബ്ജക്ടിന്റെ ഏതു
വശത്തുനിന്നുമുള്ള വ്യു
കാണാന് സാധിക്കും.
3D
വിന്ഡോയുടെ
ഇടതു മുകള്ഭാഗത്ത്
രേഖപ്പെടുത്തിയിരിക്കുന്നതില്
നിന്നും ഏതു View
(Front Otho , Front Persp, Left, Right, Back, Bottom, Top.....)
വിലാണ്
നാം ഉള്ളതെന്ന് വ്യക്തമാകും.
View മാറ്റന്
കീ ബോര്ഡിലെ Num
Pad കീകളോ,
3D
Window യുടെ
Window Header ലെ
View മെനുവോ
ഉപയോഗിക്കാം.
3D
Window യുടെ
Window Header ല്
നിന്നും നാം ഇപ്പോള് Object
Mode ല്
ആണെന്ന് മനസ്സിലാക്കാം.
കീബോര്ഡിലെ
Tab ല്
ക്ലിക്ക് ചെയ്താല് Edit
Mode ലേക്ക്
മാറും.
വീണ്ടും
കീബോര്ഡിലെ Tab
ല്
ക്ലിക്ക് ചെയ്താല് Object
Mode ലേക്ക്
മാറും.
(അല്ലെങ്കില്
3D Window യുടെ
Window Header ലെ
Object Mode
എന്നതില്
നിന്നും Edit
Mode സെലക്ട്
ചെയ്യാം.)

Step
9. നാം
ഇപ്പോള് ഉള്പ്പെടുത്തിയ
ഒബ്ജക്ടിന് (Cone)
പുതിയൊരു
പേര് നല്കാന് 3D
വിന്ഡോയിലെ
Cone സെലക്ട്
ചെയ്തതിനുശേഷം ജാലകത്തിന്റെ
വലതുവശത്തുള്ള Properties
Window യിലെ
Object ബട്ടണ്
സെലക്ട് ചെയ്യുക.
താഴെ
Cone
എന്നെഴുതിവരുന്ന
ബോക്സില് അനുയോജ്യമായ പേര്
(missile) നല്കാം.

Step
10. ഒബ്ക്ടിന്
നിറം നല്കാന് :
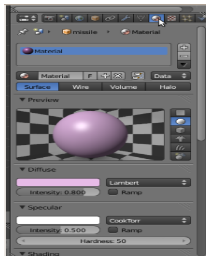
Select
the Object (Cone) → Properties Window → Material → New →
Diffuse (Diffuse colour of the material)
Step
11. 3D വിന്ഡോയുടെ
വ്യു Front
Ortho ആക്കുക.
Default വ്യു
User Ortho
എന്നായിരിക്കും.
View → Front (Or use Num Pad keys )
Step
12. Select Edit Mode ( Tab key)
Step
13. Select Wireframe. Window Header ല്
Method to display
/ shade objects in the 3D View എന്നതില്
നിന്നും Wireframe
തെരഞ്ഞെടുക്കാം.
Step
14. വൃത്തസ്തൂപികയുടെ
(Cone) പാദം
(Circle)
ഉപയോഗപ്പെടുത്തിക്കൊണ്ട്
നമുക്ക് ഒരു Cylinder
( വൃത്തസ്തംബം)
ഇതിനോട്
ചേര്ത്തുണ്ടാക്കണം.
ആദ്യം
Cone
ന്റെ
പാദം മാത്രം സെലക്ട് ചെയ്യാണം.
Deselect the Object (Cone) → Press B (to activate Box Select / Border Select Mode) . Cursor പരസ്പരം ലംബങ്ങളായ (Orthogonal Lines) രണ്ട് വരകളായി മാറും. Cone ന്റെ പാദത്തിന്റെ (Circle) ഇടത് മുകള് ഭാഗത്തേക്ക് കഴ്സര് കൊണ്ടുവന്ന്, LMB ക്ലിക്ക് ചെയ്ത് Cone ന്റെ പാദത്തിന്റെ (Circle) വലത് കീഴ് ഭാഗം വരെ ഡ്രാഗ്ഗ് ചെയ്ത് LMB സ്വതന്ത്രമാക്കുക (Release the LMB). അപ്പോള് Cone ന്റെ പാദം Select ആകും.
Step
15. Press E (Tool shelf ല്
കാണുന്ന Extrude
Region button ഉപയോഗിച്ചാലും
മതി.)
ഇതുമൂലം
മൗസ് ഉപയോഗിച്ച് ചലിപ്പിക്കാവുന്ന
പുതിയ മൂലകളും (Vertices)
മുഖങ്ങളും
(Faces)
രൂപീകൃതമാകും.
മൗസ്
ആവശ്യമായ അകലത്തിലേക്ക്
നീക്കിയതിനുശേഷം LMB
ക്ലിക്കുചെയ്യുക.

Step
16. Press A to Deselect the selection.
Step
17. താഴെ
ചിത്രത്തില് കാണുന്നതുപോലെ
സിലിണ്ടര് ഭാഗം വിഭജിക്കണം.

Select
the Cylinder part (Step 12ല്
സൂചിപ്പിച്ച രീതിയില്
സെലക്ട് ചെയ്യുക.)
→ Tool Shelf ലെ
subdivide
ബട്ടണില്
രണ്ട് തവണ ക്ലിക്ക് ചെയ്യുക.
Step
18. Press A again to Deselect the selection.
Step
19. ചിത്രത്തില്
കാണുന്നതുപോലെ സിലിണ്ടറിന്റെ
മധ്യഭാഗം സെലക്ട് ചെയ്യണം.
(Step 14 ല്
സൂചിപ്പിച്ച രീതിയില്
സെലക്ട് ചെയ്യുക.)

Step
20. Press S ( To Scale the Selection) . മൗസ്
ചലിപ്പിച്ചുകൊണ്ട് സിലിണ്ടര്
ഭാഗത്തിന്റെ മധ്യഭാഗം താഴെ
ചിത്രത്തില് കൊടുത്തതുപോലെ
ക്രമീകരിക്കുക.
Step
21. Press A again to Deselect the selection.
Step
22. ത്രിമാന
രൂപത്തിന്റെ കീഴ് ഭാഗം (
Circle) Step 14 ല്
സൂചിപ്പിച്ച രീതിയില്
സെലക്ട് ചെയ്യുക.
Step
23. Press E . മൗസ്
ആവശ്യമായ അകലത്തിലേക്ക്
നീക്കിയതിനുശേഷം LMB
ക്ലിക്കുചെയ്യുക.

Step
24. Press A again to Deselect the selection. ത്രിമാനചിത്രം
പൂര്ത്തിയായി.
Step
25. തയ്യാറാക്കിയ
ത്രിമാനചിത്രം സേവ് ചെയ്യാം.
(missile.blend)
Chapter
3 – Rendering
ഇപ്പോള്
തയ്യാറാക്കിയ രൂപം (
Missile or Rocket …) മുകളിലേക്ക്
കുതിച്ചുയരുന്ന 20
സെക്കന്റ്
നേരത്തേക്കുള്ള (
fps : 6 , No of Frames = 20 x 6 = 120 ) ഒരു
സീന് (Animation)
ആണ്
നമുക്ക് വേണ്ടത്.
Camera setup
Step
1. Open the saved file (missile.blend)
Step
2. നമ്മള്
തയ്യാറാക്കിയ ഒബ്ജക്ട്
(missile) Camera
View ല്
മധ്യത്തില് വരത്തക്കവിധം
3D വിന്ഡോയിലെ
Camera യുടെ
സ്ഥാനം ക്രമീകരിക്കുക.
Lamp setup
Top View ല് Lamp നെ ഒബ്ജക്ടിന്റെ (missile) മുമ്പിലായും Camera യുടെ എതിര് വശത്തായും ക്രമീകരിക്കുക. നമ്മുടെ സീനില് lamp ഇല്ലെങ്കില് Add → Lamp → Point എന്ന ക്രമത്തില് ക്ലിക്ക് ചെയ്ത് ഉള്പ്പെടുത്താം.
Rigging
Step
1. Object Mode
Step
2. Wirframe
Step
3. Cursor നെ
ഒബ്ജക്ടിനുള്ളിലാക്കണം
Object
→ Snap → Cursor to Active എന്ന
ക്രമത്തില് ക്ലിക്ക് ചെയ്യുക
Step
4. Add → Armature → Single Bone . ഒബ്ജക്ടിനുള്ളില്
Cursor നിന്ന
സ്ഥാനത്ത് ഒരു Bone
വന്നിട്ടുണ്ടാകും.
Step
5. Bone ഒബ്ജക്ടിനു
പുറത്തേക്കുണ്ടെങ്കില് -
in Edit mode, place the tip of the bone in object
(missile) by grabbing (G) and moving it.
Skinning
Step 1. Object
Mode
Step 2. RMB
ഉപയോഗിച്ചുകൊണ്ട്
Object (missile )
സെലക്ട്
ചെയ്തിനുശേഷം Shift
കീ
Press
ചെയ്തുകൊണ്ട്
Armature (Bone) ഉം
സെലക്ട് ചെയ്യുക.
Step 3. Press
Ctrl P → Parenting menu will appear → Select With
Automatic Weights entry.
Posing
Step
1. Select the armature(Bone) only → Select Pose Mode from the
Mode menu (Mode menu in the 3D window header).
Step
2. Select bone → move (Press G and use the mouse), or rotate
(Press R and use the mouse) → ഒബ്ജക്ടിന്റെ
സ്ഥാനത്തിലും ദിശയിലും മാറ്റം
വന്നിരിക്കും.
Step
3. Time Line window യിലെ
Current Frame 1
ആണെന്ന്
ഉറപ്പ് വരുത്തുക.
Step
4. Select the bone (press A) → Press I → A menu will appear
(Storing
the pose to the frame 1)
→ Select LocRot.
This
will get the position and orientation of the bone and store it as a
pose at frame 1.
Step 5.
Time
Line window യിലെ
Current
Frame 11 ആക്കുക.(Move
to frame 11)
→ Move or Rotate
missile (Object) to a different position.
Step
6. Select the bone (press A) → Press I → A menu will appear
(Storing the pose to the frame 1) → Select LocRot.
This
will get the position and orientation of the bone and store it as a
pose at frame 11.
Repeat
this process at frame 21, 31 and 41.........121...
Rendering
Step
1. Properties Window → Render → Dimensions → Render Presets
അനുയോജ്യമായത്
തെരഞ്ഞെടുക്കുക.
→ From range എന്നതില്
Start Frame : 1ഉം
End Frame : 121
(Time Line window യില്
നല്കിയിരിക്കുന്നത്)
ഉം
കൃത്യമാണെന്ന് ഉറപ്പുവരുത്തുക.
Frame Rate എന്നതിലെ
24fps നു
പകരം 6fps
or 12 fps നല്കാം
(Custom)
Step
2. Select AVI Raw as the file type in the Format panel.
Step
3. Render പാനലിലുള്ള
Animation button
ല്
ക്ലിക്ക് ചെയ്യുന്നതോടെ
Rendering പ്രക്രിയ
ആരംഭിക്കും.
Rendering പ്രക്രിയ
പൂര്ത്തിയായിക്കഴിഞ്ഞാല്
0000.0098.avi എന്ന
പേരില് നമ്മള് സെലക്ട്
ചെയ്ത ഫോള്ഡറില് വീഡിയോ
ഫയല് ലഭ്യമാകും.
Click here for my product
Software : Blender
Blender is a free and open-source 3D computer graphics software product used for creating animated films, visual effects, interactive 3D applications or video games. Blender's features include 3D modeling, UV unwrapping, texturing, rigging and skinning, fluid and smoke simulation, particle simulation, soft body simulation, animating, match moving, camera tracking, rendering, video editing and compositing. It also features a built-in game engine.
Wiki Page
No comments:
Post a Comment